Tuesday 21 December 2010

3D model

I created a 3d model of one of my reels and then had it printed out.

I wanted to keep it on the theme of projectors but my projector was too complicated to print. Instead The next best thing was to do one of the reels.

I added a bit of film to to make it look better. My first model that I sent to print was too thin so instead I made it thinker and bigger and I ended up with this:


I am pleased with the results and it did not break. I think I chose the right component to print as it depicts the exact theme of my final piece. 

I like it and shall put it on my window ledge.

Thursday 16 December 2010

Progress at last

I have finally managed to finish my model ofthe projector. I have also added the screen which the footage will be played on. I found it hard to find a way to make it look as though the footage was playing on the screen. This was because there is some mist in the light so if I was putting it into after effects, then I would of had to of found a way to get the image behind the mist and that was too complicated formme. Especially as I had done some experimenting with mist and compositing two pieces of footage so they played at the same time. It did not go well so I looked at a few different methods. After toning to one of my peers, I decided to create an animated texture on the screen which would look much better. After looking at some tutorials and knowing I had already created the footage, I created a successful animated texture.

The next issue I have is getting the film to move through the cogs. But again, after talking to one of my peers, I decided to use another animated texture so that I appears to move without actually moving. Whether this will be as successful as the other, I do not know but I shall give it a try.

After that I will just need to texture the metal parts, add a little animation to the reels and then render. At least I can see the finish line... Almost.

Wednesday 15 December 2010

Tate Britain

I went up London to see the Eadweard Muybridge exhibition at the Tate Britain. I thought this would be good research, especially as I am using his photography as part of my project.


Whilst at the Tate, I saw a lot of his photography and also discovered a lot of history about him. He moved to New York from England when he was 22 and then moved to San Francisco when he was 25. He was involved in a stage coach accident and returned to England to recuperate. 

When he moved back to America in 1867, he worked as a photographer, photographing landscapes of valleys and different areas around california. He then began to work for a gentlemen called Leland Stanford who requested him to photograph his horses. 

In 1874, his wife has a son fathered by a lover rather than himself. In his rage he killed her lover but was found out and tried for murder. He was acquitted on the grounds of justifiable homicide. 

After this he returns to his photography, taking panoramic pictures of San Francisco and still working for Stanford. In 1877 was when he began to take shots of horses in action. This then progressed to athletes and  in 1881 he published a book with all his motion shots of horses and other animals. He experimented with his technique and used high speed shutters to capture this. He would create a line of cameras with trip switches so when the horse set them off, the cameras would take a photo creating the animals in motion.

It was a good trip and I learnt a lot about the Muybridge. I did not learn much about the development of his technique or where the idea came from which would have been more interesting but I saw his photography and his book of animals in motion.

Tuesday 7 December 2010

Footage

While I am making slow progress on the model, I have decided to make the footage that will play onto the screen. It was hard to find any footage that was not copyrighted and that I could easily edit. There were plenty of images on the internet so I decided to use the images, cut them up and create my own footage. This way I could also add the Sky Arts logo. 

It took some PhotoShop work, a lot of slicing and building up of layers and some creative thinking to create my different images to create my final footage. I wanted to have the Sky Arts logo look as though it was part of the original film so i had to use some blending and blurring techniques. I originally wanted in on the horse but the soon discovered the horse bends and contorts too much for me to add the logo on its back. I then decided to add it to the corner but to make it look even more authentic, have it moving slightly from frame to frame to male it look jumpy - just like it would of looked in that century. 

This is an example of one of the images:


There is eleven of these images which make a sequence which is looped. The end footage is also very jumpy and flickery which is the old style effect I was going for. 

This is my footage so far:


This has definitely been a successful couple of days.

Thursday 25 November 2010

Progress

I have been concentrating on my model and trying to get all the correct components in place. I am finding it very hard as it is being modelled from one reference image and I have had to model each little component and move it into place.  My model so far does have some materials and textures applied to it as I was testing different materials out. This is my model at its current state.


It still needs a lot of work and better texturing as well as lighting. I still have a long way to go but at least that will be the hard part over.

The light test from last week was not what I had hoped and was not happy with it at all. I had to work around this and find a way of making it look better and more like a real projection. I accomplished this by making the screen smaller than the light so it looks more realistic.

Below is a picture of it to show what the light will look like once the model is finished.

I am also working on getting the Muybridge footage of the running horse. I am having trouble finding it without any protection or copyright on it so I have decided to make my own footage using an image and then am going to loop it. I will need to make a sky arts logo to add onto the footage and onto the projector. I will edit this is After Effects and then try and do a test to make it look as though it is being projected onto the screen.

Monday 22 November 2010

Concepts

I have drawn up some concepts of what i had in mind fro my projector. They are very rough sketches but they give me an idea of what it will look like and how it all works and pieces together.


My scanner is not very good so unfortunately they are photos in poor lighting.

From these concepts, I have managed to draw up a basic idea of what I want my animation to look like. It is going to have very subtle animation with soft and moody lighting.  I will have my screen showing Muybridge's horse in motion and incorporate the sky arts logo into the footage. 

I have decided to use the "thomas" piece of audio that came with the Sky Arts pack. I chose this because it builds up like I am planning my animation to do. 

Here is my storyboard that I have drawn up.


I am going to stick to this as best that I can as it will make it easier for me to know what I am trying to achieve. I do like this idea and am hoping to pull it off really well. 

I am going to begin the modelling and always have my storyboard in mind so I know exactly what I need to do and what I need to model.

Wednesday 17 November 2010

Tests

So I have begun to model the projector. I want it to look similar to this:


I have had to restart modelling for this over an over again because I could not get the wheel parts to look exactly as I wanted them to. I had to also try lots of different methods (unsuccessfully I may add) which took a lot of time.

I have finally managed to get the face of the wheel as I wanted it but my next challenge is to make it into an actual wheel rather than a face of it. This is going to take a lot of thinking about because I tried just lofting the two faces together, but once it was smoothed so the wheel was a curve, the loft stayed very angular and did not work with the wheel.

Below is a picture of the finished wheel face without being smoothed:


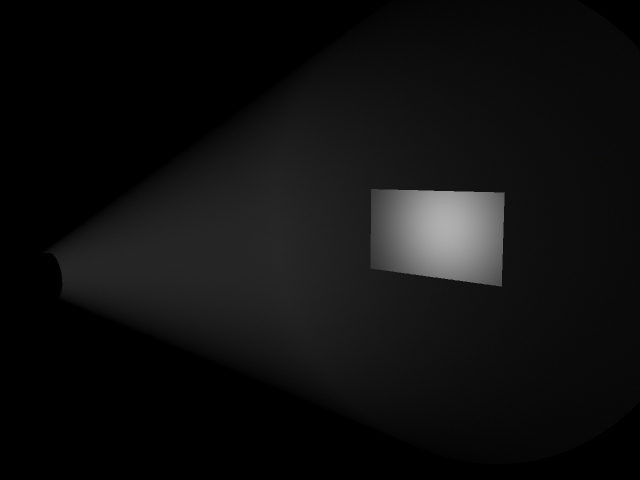
The next thing I have done is some primary light tests for the projector. This was to experiment to see if i could create a light that made it look as though it was coming from the projector. I added some fog to the light to make it a bit more realistic. I looked on the internet for some tutorials to create light from a projector but all i found was a suggestion of using a spotlight. In the end I did use a spotlight and played around with the settings (this is how I stumbled across the fog attribute). I could not make a perfect square light which i found extremely annoying but this was a picture of my attempt:


I need to search deeper into how I am going to make it look like an actual projection but at least I now know how to make a simple one and I'm sure that if I experiment more, I will be able to produce something quite convincing.

That was my progress over the last couple of days anyway.

Thursday 11 November 2010

Chosen idea

I have thought about different ideas including ink and water turning into different things associated with SKY Arts and then the SKY Arts logo. I have also thought about different artists and taking inspiration from them, mainly looking at Eadward Muybridge.

My first idea was a zoetrobe and as it spun around the SKY Arts logo is animated. It will have an old style effect on it so it looks like it came form the time of Muybridge. This made me look into other work done by Muybridge and led me into film and the idea of having a film projector playing Muybridge's work and have the SKY Arts logo incorporated.

I liked this idea the most so have begun to look at reference images for old film projectors.

I now have three tests to complete. I need to model the film projector, I need to find away of making it look as though I am projecting footage onto a screen and i need to do some light tests to find the best way of making it look like a realistic projection.

Thursday 4 November 2010

Introduction

 I have chosen to do the SKY Arts brief. This was mainly because I wanted to push myself as I can pretty much do whatever I want and not narrowed myself down. Also I am very interested in advertising.

The first stages are to research, research and more research! The first thing to research was quite obvious - SKY Arts. I found out about what they do and what type of programmes they host. I looked at their previous idents and found a couple of videos on youtube that were almost exactly what the brief described.

Previous SKY Arts idents:


Previous SKY Arts 2 idents:


Looking at these, I realise that I have a lots of work to do.

I had a few initial ideas. Mainly with liquids. Like ink in water, paint on a canvas and lights but I need to do some more research and some Maya tutorials with liquid and lights to see if my ideas will work.